
itcctv_soft
20/07/2025
Hướng dẫn tạo Point Cloud 3D từ ảnh Depth bằng thư viện PCL
1. Giới thiệu
Bài hướng dẫn này trình bày cách tạo và hiển thị dữ liệu đám mây điểm (Point Cloud) 3D từ ảnh độ sâu (depth images) và ảnh RGB sử dụng thư viện Point Cloud Library (PCL). Trong hướng dẫn này, chúng ta sẽ sử dụng camera Intel RealSense D435, một camera tiên tiến được trang bị cảm biến độ sâu stereo và cảm biến RGB, cho phép thu thập hình ảnh và dữ liệu độ sâu chính xác để xây dựng mô hình 3D.
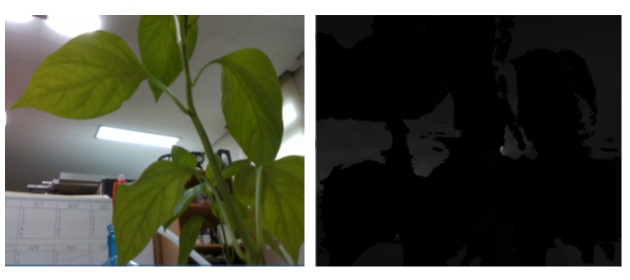
Ảnh depth là hình ảnh biểu thị khoảng cách từ camera đến từng điểm trong không gian theo từng pixel, cung cấp thông tin chiều sâu của môi trường. Ảnh RGB là ảnh màu thông thường, thể hiện các giá trị màu sắc đỏ (Red), xanh lá (Green) và xanh dương (Blue) của từng pixel.
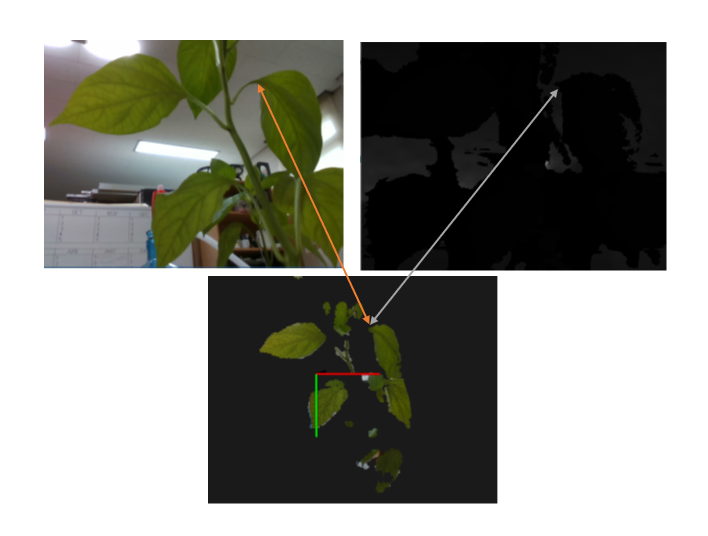
Ảnh RGB (bên trái) ảnh depth (bên phải) và ảnh 3D tạo được (ở dưới)
2. Chuẩn bị
Trước tiên, bạn cần cài đặt thư viện PCL:
- Clone thư viện từ GitHub:
git clone https://github.com/PointCloudLibrary/pcl.git- Tạo và vào thư mục build:
mkdir build && cd build- Chạy lệnh cmake:
cmake ..- Biên dịch và cài đặt:
make -j2 && sudo make install3. Chuẩn bị dữ liệu
- Chuẩn bị sẳn ảnh depth và ảnh rgb tương ứng, hoặc chụp ảnh từ camera depth ( ví dụ như D435)
4. Công thức chuyển đổi điểm 2D sang 3D:
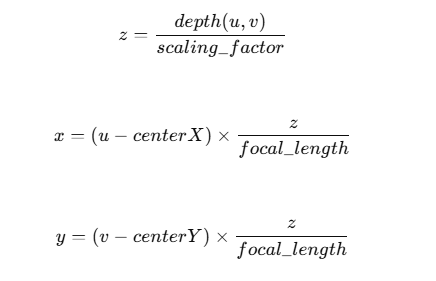
Để tính tọa độ điểm (x,y,z) từ giá trị depth (u,v):
scaling_factor: hệ số tỷ lệ từ dữ liệu depth.(centerX, centerY): tọa độ trung tâm của camera.focal_length: tiêu cự của camera (tính theo pixel).
PointCloud::Ptr createtarget_colorpointcloud(cv::Mat &color, cv::Mat &depth,
double depthScale, double cx, double cy, double fx, double fy)
{
PointCloud::Ptr current(new PointCloud);
current->points.clear();
for (int v = 0; v < color.rows; v++)
{ for (int u = 0; u < color.cols; u++)
{
unsigned int d = depth.ptr<unsigned short>(v)[u]; //get the distance for a pixel
Eigen::Vector3d point;
point[2] = double(d) * depthScale;
if (point[2]== 0 || point[2] >2) continue; //select the point within 2m
point[0] = (u - cx ) * point[2] / fx ;
point[1] = (v - cy ) * point[2] / fy ;
Eigen::Vector3d pointWorld ;
pointWorld = point;
PointT p;
p.x = pointWorld[0];
p.y = pointWorld[1];
p.z = pointWorld[2];
p.b = color.data[v * color.step + u * color.channels()];
p.g = color.data[v * color.step + u * color.channels() + 1];
p.r = color.data[v * color.step + u * color.channels() + 2];
// if( p.r == 0 && p.g == 0 && p.b == 0)
// continue;
current->points.push_back(p);
}
}
return current;
}
5.Hiển thị Point Cloud
void show_3d()
{
double cx = 328.879272460938;
double cy = 242.60676574707;
double fx = 601.466491699219;
double fy = 601.211242675781;
double depthScale = 0.00025; //de distance value of one unit in depth value
PointCloud::Ptr pt = createtarget_colorpointcloud(rgb,depth,depthScale,cx,cy,fx,fy);
// voxelize(pt,*pt,0.001);
cout << "number of points: " << pt->points.size();
cv::imshow("color", rgb);
cv::imshow("depth", depth);
viewer->showCloud (pt, "body" );
cv::waitKey(0);
while(!viewer->wasStopped()){
// viewer->
}
}
Để giảm số lượng voxel dùng hàm:
void voxelize(PointCloud::Ptr pc_src, PointCloud pc_dst, double var_voxel_size){
pcl::StatisticalOutlierRemoval<PointT> sor;
sor.setInputCloud (pc_src);
sor.setMeanK (50);
sor.setStddevMulThresh (1.0);
sor.filter (pc_dst);
pc_src->points = pc_dst.points;
pcl::VoxelGrid<PointT> voxel_filter;
voxel_filter.setInputCloud(pc_src);
voxel_filter.setLeafSize(var_voxel_size, var_voxel_size, var_voxel_size);
voxel_filter.filter(pc_dst);
pc_src->points = pc_dst.points;
}
Chạy chương trình để tính toán và hiển thị dữ liệu 3D từ ảnh đã chụp. Dữ liệu point cloud sau đó sẽ được hiển thị trực quan qua viewer của thư viện PCL. Xem thêm tại : https://youtu.be/BncpXNwmLbo
Chúc bạn thực hiện thành công!


Bình luận